

This tutorial is my own creation and anything similar is merely coincidental.
Please link back to my blog if you're going to share this tutorial.
This tut was written April 4th, 2013
This tutorial was created using Photoshop CS5.
Font needed for this is Xenippa Regular and you can find it HERE
Chrome Border and Bubble Layer Style for Text can be found HERE
Those are all the supplies you need.
Now let's get started.
Open up a new Layer and make it 570x235. Set your Font size to 150pt. Write your text in any color preferably black, but any color will do.

(1)


Open up a new Layer and make it 570x235. Set your Font size to 150pt. Write your text in any color preferably black, but any color will do.

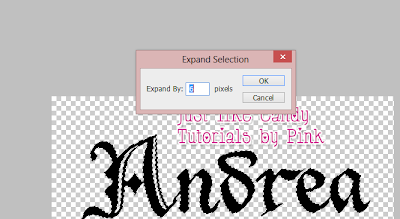
Now click on the Text on the Layer palette to select your Text. Once you have it selected, go to (1)Select>Modify>Expand. Expand by 6. (2)Create a new Layer and place it underneath your text while your original text is still selected. (3)Grab your Paint Bucket tool and fill your new Layer with that color. You can use any color for this, but make it a contrasting color so that you can see the two different text layers. The end result should look like (4)

(2)

(3)
(4)

Now you should have two layers in two different colors. Here is where we are not going to apply the layer styles. Layer styles are very simple. They are text effects or you can apply them on shapes, papers, literally anything. I'm going to show you how to apply Layer styles and you'll probably use Layer Styles with every tag you make from now on. Now let's learn how to download layer styles. Go to the above link I gave and download the Chrome Layer Style and the Bubble Text layer Style.
Unzip the contents into a folder and name it Layer Styles so that it's easy to find. Now, go to Windows>Styles. These are all of your Styles that you can apply to anything. There are many free Styles for download on Deviantart. It's all a matter of searching. This is what the Styles box looks like:
Click where the Pink arrow is and go to Load Styles. Find the style you just loaded. This should add Bubble Text and the Chrome Style to your Styles box. Now for the easy part. Now back to your two Text copies. On the bottom layer, apply the Chrome. On the top Text layer, apply the Bubble text. You can go into either and adjust the Drop Shadow if you'd like. If you want to change the color of the bubble, go to Color Overlay and change it to any color of your choice. Your text should now look like this:
Make a new Layer to merge with the Chrome layer and one for the bubble layer. Highlight the bubble text layer by clicking on that, and the new empty layer. Once they're lit up in blue, press Control E to merge the layers. Your layer palette should look like this when they are merged properly. Now repeat this step with the Chrome layer. The second picture is how your palette should look after you've done that.
Now you can add a little noise, a filter or whatever you choose onto your Color bubble layer. I added noise by going to Filter>Noise>Add Noise in the amount of 6. If you want you can stop here and this will be your end result:
You can also animate this by making 3 layers before adding noise of the bubble layer. Apply noise in consecutive amounts on each of the 3 layers. Open the animation window by going to Windows>Animation. Make 3 frames. On First frame, check first bubble text layer, 2nd frame, uncheck the first layer..and check the 2nd bubble text layer. Go to frame 3, uncheck layer 2 and check layer 3. On the noise, go one up or set the amount to go up in increments for example 8.5, 9, 9.5 etc. Set the glitter to 0.1 seconds and you'll get something similar to this:
NOTE: If you are animating, you will need to use a white or whatever color background to match the forum or site you use it on in a separate layer that you'll place on the bottom of the layer palette. For this of course, I used baby pink to match this blog.
That's it. Hope you guys come up with some great creations and remember, you can change the dimensions, shine, depth and drop shadow of any of my supplies to make it to your liking.
No comments:
Post a Comment